LIT · Lighting
Soft Light Photography: Finding and Shaping Gentle Light
Soft light wraps around your subject with gradual shadow transitions. Here is how to find it outdoors and how to create it indoors.
Diagrams

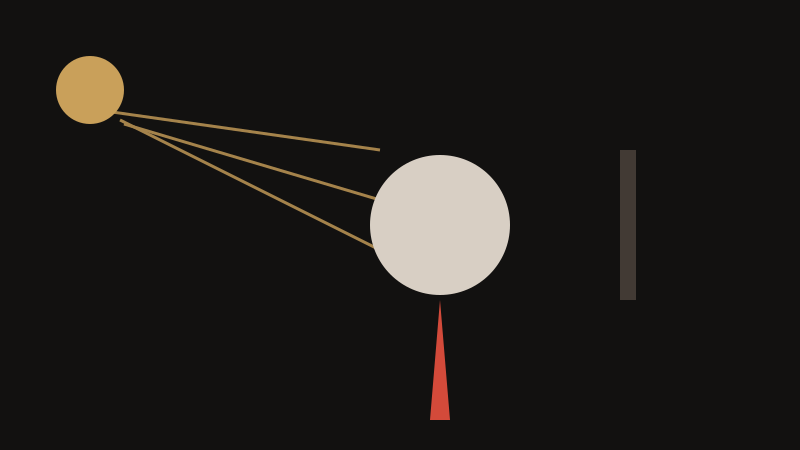

Soft light is not about how bright the source is. It is about how large the source looks relative to your subject. A big source placed close produces gradual, gentle shadow edges; a small or distant source produces hard, defined ones. That is why the whole overcast sky acts like one enormous softbox, and why a bare speedlight across the room looks harsh.
Softness also lowers contrast: highlights and shadows move closer together, skin looks smoother and texture is subdued. The trade-off is that soft light can look flat, so you usually need to separate your subject from the background or add contrast later.
Softness Is Size, Not Power
A soft light is one whose shadow edges fade gradually rather than stopping abruptly. That quality depends on the apparent size of the source from the subject's position, which is why a small flash in a big white umbrella is soft and the same flash bare is hard.
This gives you one reliable lever: make the source bigger, or move it closer, or both. A one-metre diffuser 60 centimetres from a face is far softer than a two-metre one on the other side of the room, because what matters is the angle the source subtends at the subject.
Power only changes the exposure, and it is worth separating the two ideas in your head. Turning a lamp up makes the picture brighter, not softer; only the size and distance of the source change the character of the shadow.
Finding Soft Light Outdoors
Outdoors, hunt for soft light in overcast weather, before sunrise and after sunset, in fog, and in open shade. Open shade means your subject stands in shadow while a large patch of open sky is in front of them: beside a building wall, under a porch, or at the shadow edge of a tree line.
Face your subject toward that open sky and you have a free softbox. Turn them away, and they are lit only by bounce from the ground and the surroundings, which is usually darker, greener and much less flattering.
Avoid dappled light under leaves, which creates scattered bright spots that look like a mistake rather than a pattern, and watch for a green colour cast when you shoot under dense foliage. Fog is the softest light of all, and it also separates the layers of a landscape.
Creating Soft Light Indoors
To create soft light, use the translucent panel of a 5-in-1 reflector, a scrim, a shoot-through umbrella, or a softbox. Two rules govern all of them: bigger is softer, and closer is softer. Everything else about these modifiers is a detail compared with those two variables.
Feathering is the technique worth learning first. Aim only the edge of the beam at your subject rather than the centre, and the intensity and contrast drop further, because the light at the edge of a modifier is dimmer and more diffuse than at its centre.
White foam boards and pale walls also bounce soft fill into shadows, and they are free. A board on the shadow side, just out of frame, lifts the dark side of a face without adding a second shadow, which is often all a portrait needs.
Exposure and Contrast Problems in Soft Light
Because soft light is dim, raise the ISO, open your aperture, or brace the camera. Motion blur is the common failure in soft light, precisely because the light invites you to hand-hold at speeds that are too slow for the subject.
If the result looks lifeless, darken the background, add a little negative fill with a black card, or increase clarity and contrast in editing. A subject lit softly against a background one or two stops darker separates beautifully, which is why photographers working in overcast weather spend so much time looking for a dark background.
Watch for muddy colour as well. Flat light makes skin tones look grey rather than warm, and a small white balance adjustment is usually all that is needed to bring them back.
Subjects That Suit Soft Light, and Mistakes to Avoid
Soft light rewards careful framing and expression more than gear, which makes it ideal for portraits, babies, food and detail shots. It also hides blemishes and shines on anything with a smooth surface, from skin to ceramics to foliage in a wood.
The mistakes are predictable. Shooting under trees and getting dappled patches is the first. Letting the subject face away from the open sky is the second, and it is the one that most often ruins an otherwise good shot in the shade.
The third is accepting flatness as a fact. Soft light is not the same as boring light; it simply hands the job of separation and depth to your framing and your background choice, and asks you to do them deliberately.
Key points
- Softness depends on the size of the light relative to the subject, not on its power: big and close wins.
- Overcast skies, open shade, fog and the 30 minutes after sunset give you free, even soft light.
- Diffuse with a scrim, shoot-through umbrella or softbox, and feather the beam for even lower contrast.
- Soft light looks flat if you leave it alone, so darken the background or add contrast in post.
Frequently asked questions
- Is overcast weather bad for photography?
It is excellent for some subjects and poor for others. Overcast light is even, colour-accurate and forgiving, which suits portraits, plants, food and architecture. It removes the direction and contrast that make a landscape dramatic, so for wide views it usually flattens the scene. In that case, underexpose slightly and look for a foreground that gives the frame depth.
- How do I add punch to a flat, softly lit photo?
Start by separating the subject from the background, either by moving so the background is darker or by adding a small amount of negative fill with a black card on the shadow side. In editing, a gentle S-curve and a little clarity add local contrast without losing the softness of the shadows, which is what makes the light attractive in the first place.
- Do I need a softbox to shoot soft portraits at home?
No. A large window is the best free modifier you own, and a sheet of translucent material taped over a frame or a window works as a scrim. A white foam board on the shadow side completes the setup. Studio modifiers become worth the money when you need repeatability and control over the direction and intensity of the light.
- What size modifier should I buy first?
Buy the largest you are willing to set up regularly, because size is what produces softness, and an unused modifier is worth nothing. A shoot-through umbrella is cheap, folds small and works at close range, which makes it a sensible first purchase. Whatever you choose, get it close to the subject rather than leaving it across the room.